
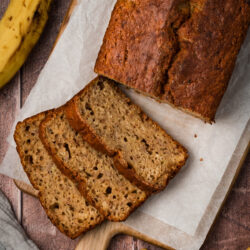
When winter chills set in, nothing beats the comforting taste of Spiced Pear and Pistachio Bread—rich, nutty, and delightfully sweet.

Is there anything better than warm Spiced Pear Bread on a cold winter day? The only thing better is Spiced Pear Bread with Pistachios.

This recipe actually started as pancakes, which didn’t quite work. But I knew pear and pistachios could be amazing together, so I kept experimenting.
I’m so glad I did because this bread turned out incredible. The pears add a creamy texture, while the pistachios bring just the right amount of crunch. Together, they create a salty-sweet combination that’s simply irresistible.
Table of Contents

Reasons to Love This Pear Bread
- Spiced Pear and Pistachio Bread keeps well, so you can bake it ahead of time and enjoy it throughout the week, whether for breakfast, a snack, or dessert.
- The pears make the bread incredibly moist and tender—every slice is so satisfying.
- It’s the perfect gift—one of those homemade treats that everyone loves receiving, especially during the holidays.
Recipe Ingredients

- Pears: These add a natural sweetness and keep the bread wonderfully moist.
- Pistachios: Bring a nice crunch and a rich, nutty flavor that complements the sweet pears and spices well.
- Allspice: With hints of cinnamon, nutmeg, and clove, allspice gives the bread a rich, warm flavor.
For a full list of ingredients and amounts, see the recipe card below.
Variations
- Add-Ins: Add a handful of dried cranberries or chopped dates for a touch of sweetness, or a sprinkle of orange zest for a citrusy twist. A dash of cardamom or ginger can also add a unique flavor. For extra crunch, consider adding chopped nuts like walnuts, pecans, or almonds.
- Dusting and Drizzle Variation: A simple vanilla glaze, made with powdered sugar, milk, and vanilla extract, adds a sweet, classic touch. For a warm, spiced sweetness, a honey-cinnamon drizzle is another great choice. If you prefer something lighter, a powdered sugar dusting can provide a delicate sweetness.
How to Make Spiced Pear and Pistachio Bread
Make the Pear & Pistachio Bread
Step #1: Preheat your oven to 350 degrees Fahrenheit (175 degrees Celsius). Line a loaf pan with parchment paper, leaving an overhang on both sides so you can easily lift the loaf out of the pan once it has baked.
Step #2: In a medium bowl, whisk together all of the dry ingredients except the sugar.
Step #3: In a large bowl, beat together the cooled melted butter, egg, sugar, and vanilla extract.
Step #4: Add half of the dry mixture to the wet mixture and whisk to combine. Stir in the whole milk and heavy cream, then add the rest of the dry mixture and whisk well. Fold in the pears and pistachios.
Step #5: Pour the mixture into the prepared loaf pan and bake for 55-60 minutes or until a toothpick comes out clean. Let cool for 15 minutes on a wire rack, then use the parchment paper to lift the loaf out of the pan to cool directly on the rack until completely cool.
Make the Maple Cream Cheese Drizzle
Step #1: Combine the cream cheese, maple syrup, and butter in the bowl of a stand mixer fitted with the whip attachment until combined, about 2 minutes.
Frost the Pear & Pistachio Bread
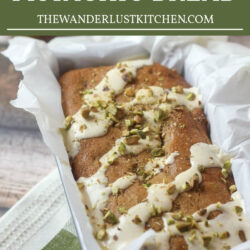
Step #1: Once the loaf has cooled, use the parchment paper to lift the loaf back into the loaf pan. Pour the maple cream cheese drizzle over the top of the loaf. Sprinkle extra pistachios on top of the frosting. Refrigerate until set (about 30 minutes).
Step #2: – OR – If you can’t wait for all of the cooling, serve individual pieces of pear bread and drizzle the maple cream cheese mixture over the top, then sprinkle extra pistachios on top of the frosting.

Expert Tips
- Don’t Overmix the Batter: When combining wet ingredients and dry ingredients, mix just until combined. Overmixing can result in a dense, tough loaf. A few lumps in the batter are perfectly fine.
- Check for Doneness Early: Oven temperatures can vary, so start checking for doneness at the 50-minute mark. Insert a toothpick into the center; if it comes out clean or with a few crumbs, it’s ready.
- Achieving Desired Consistency: When folding in the pears and pistachios, use a silicone spatula or the back of a spoon. Both are flexible and gentle, ensuring you incorporate the ingredients evenly without overmixing, helping to maintain the bread’s light texture.
FAQs
To give your Spiced Pear and Pistachio Bread a subtle green hue, you can add a few drops of green food coloring or some matcha powder. Additionally, using finely chopped pistachios can enhance the green tint naturally. Start with a small amount and mix it into the batter until you reach your desired shade. Be careful not to add too much, as it could alter the flavor or texture slightly.
No, you don’t have to peel the pears for this recipe if the skin is thin and tender, as it will soften during baking. However, if the pear skin is thick or tough, it’s a good idea to peel them to ensure the bread has a smooth texture.

Storage Info
To store Spiced Pear Bread, wrap it tightly in plastic wrap or place it in an airtight container. It will stay fresh at room temperature for up to 3 days and 5-7 days in the refrigerator. For longer storage, you can freeze the bread for up to 3 months; just wrap it in plastic wrap and aluminum foil before placing it in the freezer.
To reheat, thaw at room temperature, then warm in the oven at 350 degrees Fahrenheit (175 degrees Celsius) for 10-15 minutes.
More Delicious Bread Recipes You’ll Love

Spiced Pear and Pistachio Bread Recipe
Ingredients
For the Pear & Pistachio Bread
- 2 c. all-purpose flour
- 1/2 tsp. cinnamon
- 1/2 tsp. nutmeg
- 1/2 tsp. allspice
- 1 tsp. baking powder
- 1/2 tsp. baking soda
- 1/2 teaspoon salt
- 1/4 c. melted butter - cooled to room temperature
- 1 egg
- 1 c. white sugar
- 2 tsp. vanilla extract
- 1/2 c. whole milk
- 1/4 c. heavy cream
- 2 medium pears - cored and diced (you may want to remove the peel if it is very thick)
- 1/3 c. shelled pistachios - chopped (plus a little extra for topping)
For the Maple Cream Cheese Drizzle
- 4 oz cream cheese
- 1/4 c. real maple syrup - not pancake syrup
- 2 Tbsp. room temperature butter
Instructions
Make the Pear & Pistachio Bread
- Preheat your oven to 350 degrees Fahrenheit (175 degrees Celsius). Line a loaf pan with parchment paper, leaving an overhang on both sides so you can easily lift the loaf out of the pan once it has baked.
- In a medium bowl, whisk together all of the dry ingredients except the sugar.
- In a large bowl, beat together the cooled melted butter, egg, sugar, and vanilla extract.
- Add half of the dry mixture to the wet mixture and whisk to combine. Stir in the whole milk and heavy cream, then add the rest of the dry mixture and whisk well. Fold in the pears and pistachios.
- Pour the mixture into the prepared loaf pan and bake for 55-60 minutes or until a toothpick comes out clean. Let cool for 15 minutes on a wire rack, then use the parchment paper to lift the loaf out of the pan to cool directly on the rack until completely cool.
Make the Maple Cream Cheese Drizzle
- Combine the cream cheese, maple syrup, and butter in the bowl of a stand mixer fitted with the whip attachment until combined, about 2 minutes.
Frost the Pear & Pistachio Bread
- Once the loaf has cooled, use the parchment paper to lift the loaf back into the loaf pan. Pour the maple cream cheese drizzle over the top of the loaf. Sprinkle extra pistachios on top of the frosting. Refrigerate until set (about 30 minutes).
- – OR – If you can't wait for all of the cooling, serve individual pieces of pear bread and drizzle the maple cream cheese mixture over the top, then sprinkle extra pistachios on top of the frosting.


This pear pistachio bread was moist, lightly spiced, and perfect with a cup of coffee.
Love it! I only had honey for the cream cheese glaze and almonds for the nuts but it turned out beautifully! Yum yum and yum.
So glad you loved it! Thanks for sharing your changes! – Linda