
Savor the unexpected twist with our Honey and Herb Bread – a harmonious blend that elevates your taste buds with its unique sweet meets savory charm. Turn an ordinary meal into an extraordinary experience!

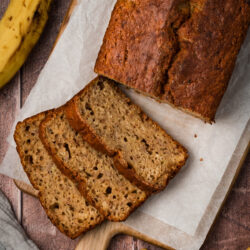
Introducing honey and herb bread – a delightful addition to my kitchen. This loaf offers a symphony of flavors, uniting the innate sweetness of honey with the fragrant richness of herbs. Whether you’re an experienced baker or a beginner in the art of bread-making, this recipe opens the door to crafting homemade bread with a soft, fluffy interior and a beautifully crispy, golden crust. It strikes that ideal harmony between sweet and savory.
But here’s the best part – it’s a piece of cake (well, bread!) to whip up. In just a few steps, you’ll have your kitchen smelling like a gourmet bakery, and your loved ones salivating for that first bite. And the versatility is a game-changer; this bread complements everything from soups to salads and cheese platters.
Table of Contents
Why We Love This Recipe
- Honey and herb bread offer a perfect balance of sweetness from honey and savory flavors from herbs.
- The enticing aroma of herbs and honey is irresistible.
- Great as a side, snack, or with cheese, making it a versatile choice.
- Its soft interior and crusty exterior provide a delightful textural contrast.
- The use of honey makes it a healthier option.
Recipe Ingredients

- Honey: Adds a touch of natural sweetness, which not only flavors the bread but can also contribute to a beautiful golden-brown crust.
- Herbs: Caraway seed, thyme, and rosemary infuse the bread with aromatic and savory notes.
See the recipe card for full information on ingredients and quantities.
Variations
- Garlic Butter Twist: Mix minced garlic into softened butter. Spread onto the dough before baking for a rich, garlicky crust.
- Basil and Olive Oil Infusion: Substitute honey with olive oil and add fresh chopped basil for a savory, aromatic twist.
- Mediterranean Fresh Herb and Parsley Bread: Replace dried herbs with a hearty mix of fresh parsley, oregano, and other fresh herbs, finely chopped, for a lively and aromatic flavor.
- Italian Herb Blend: Swap caraway, thyme, and rosemary with equal parts of dried Italian herbs and marjoram for a classic Italian taste.
- Bread Flour Swap: Substitute all-purpose flour with bread flour for a chewier texture and a loftier loaf. You can also use active dry yeast instead of instant yeast. But remember to dissolve it in warm water first to activate it before adding it to the large bowl with other ingredients.
How to Make Honey and Herb Bread
Step #1: Place all of the ingredients in the bowl of a stand mixer. Use a spatula to roughly combine them. Let the mixture rest for 15 minutes.
Step #2: Attach the dough hook attachment to the stand mixer and knead on medium for 5 minutes. Cover and let the dough rise for 60 minutes.
Step #3: Line a baking sheet with parchment paper. Punch down the dough, transfer it to the lined baking sheet, and divide it in half. Shape each half into a loaf and let them rise for another 60 minutes.
Step #4: Place a second baking sheet on the bottom rack of your oven and preheat to 400 degrees Fahrenheit (200 degrees Celsius).
Step #5: Dust the loaves with a sprinkling of flour and use a serrated knife to make three cuts on the top of each loaf.
Step #6: Transfer the loaves on the lined baking sheet to the middle rack of the preheated oven.
Step #7: Carefully pour about a cup of water onto the hot baking sheet on the bottom rack and quickly close the oven door. Bake for 30 minutes, or until the loaves are golden brown.

Expert Tips
- Yeast Activation: Ensure your yeast is active for a good rise. If you’re unsure about its freshness, you can mix the yeast with lukewarm water and a half teaspoon of sugar and wait for 10 minutes. If it becomes frothy, the yeast is active.
- Flour Quality: The quality of flour can greatly affect your bread. For a more rustic and artisanal texture, you could try a mix of all-purpose and bread flour.
- Hydration: Bread dough hydration is key. The recipe calls for a specific amount of water, but depending on the flour and ambient conditions, you might need to adjust slightly. The dough should be tacky but not overly sticky.
- Shaping the Loaves: When shaping the loaves, be gentle to retain the gas bubbles created during fermentation. This will ensure a good crumb structure.
- Cooling: Allow the bread to cool completely on a wire rack before slicing. Cutting into hot bread can release steam and make the inside gummy.
Frequently Asked Questions
Yes, you can bake the bread in a greased loaf pan for a more uniform shape.
The bread should sound hollow when tapped and be golden brown on top.
Absolutely, just use a wooden spoon or your hands until the ingredients are well combined.
Use a water bath during baking or bake in a Dutch oven to create steam.
Yes, dissolve the yeast in warm water with a pinch of sugar until it becomes frothy.
Storage Info
Honey and herb bread, like most homemade breads, is best enjoyed fresh, but you can store it if needed. Once fully cooled, wrap the bread in plastic wrap or aluminum foil, and keep it at room temperature where it will stay fresh for about 2 to 3 days. For longer storage, you can slice the bread and freeze it in a sealed freezer bag for up to 3 months. To retain the bread’s moisture, you can also freeze whole loaves—just make sure to wrap them tightly. To reheat, place thawed or frozen slices in a toaster, or warm whole loaves in a preheated oven at 350°F (175°C) for about 10 minutes. If the bread is slightly stale, spritz it with water before reheating to revive the crust.
More Delicious Bread That You Will Love

Honey and Herb Bread Recipe
RECOMMENDED PRODUCTS
Ingredients
- 1 tablespoon active yeast
- 5 1/3 cups all-purpose flour
- 2 cups lukewarm water
- 1 teaspoon salt
- 1 tablespoon honey
- 1 tablespoon caraway seed
- 1 teaspoon dried thyme
- 1 teaspoon dried rosemary
Instructions
- Place all of the ingredients in the bowl of a stand mixer. Use a spatula to roughly combine them. Let the mixture rest for 15 minutes.
- Attach the dough hook to the stand mixer and knead on medium for 5 minutes. Cover and let the dough rise for 60 minutes.
- Line a baking sheet with parchment paper. Punch down the dough, transfer it to the lined baking sheet, and divide it in half. Shape each half into a loaf and let them rise for another 60 minutes.
- Place a second baking sheet on the bottom rack of your oven and preheat to 400 degrees Fahrenheit (200 degrees Celsius).
- Dust the loaves with a sprinkling of flour and use a serrated knife to make three cuts on the top of each loaf.
- Transfer the loaves on the lined baking sheet to the middle rack of the preheated oven.
- Carefully pour about a cup of water onto the hot baking sheet on the bottom rack and quickly close the oven door. Bake for 30 minutes.


This sounds so good! Just curious if you’ve tried it in any more shapes. I tend to prefer the look of a round loaf rather than a log. Would that work with this recipie?
Hi Andrea,
Yes, this will work. Enjoy!
– Linda
This recipe looks delicious! Do you think it would turn out well in a dutch oven?
Hi Ruth,
I’m not sure how well it would work in a dutch oven. I haven’t baked any bread in a dutch oven before.
– Linda
This bread look amazing! Can I use bread flour in place of all purpose flour?
Hi Kara,
Yes, you can.
– Linda
Seriously good bread. . . I love the dialogue that you have before you post the recipe it’s very funny.
I kill myself stop cooking the same thing and go to wonderlust kitchen and get a new favorite dish.
thank you so much for taking the time to give us recipes hints and tips.
I make this bread once a week! It is also my go to for hostess gifts and thank you gifts. Easy and addictively yummy.